

A Crating sharing site on crafting idea's that other's can do at home with kids and teach to recycle at the same time as well as have fun and have that quality time together.
Wednesday, March 21, 2012
Bottle Buddy
Saturday, March 17, 2012
Feather Charms

Wednesday, March 14, 2012
Jellybean Bracelet
We all have those leftover jellybeans, and if your like me and love the jelly-belly's jellybeans, then this is something you can make today and munch on as well. this one I made for my daughter, I love the jellybean bracelet, it's fun and easy to make. your items you will need for making this cute crafty bracelet is, dental floss, or use the stretch jewelry string. either or is fine. I used dental floss, little more sturdier and alot easier to thread your needle through. use a brand new needle when making, since kids are going eat the jelly beans it needs to be new, you can sterilize in hot water, but I like new. you will need a small bag of jelly-bellies jellybeans. once you thread your needle, start stringing on your jellybeans. measure your childs wrist first and go from there, mine was 20 jellybeans, once strung onto your floss/string, tie a knot several times, and cut off ends, and your done. let kids wear and munch and enjoy. once kids are done, throw floss/string sway. and you can also make a necklace as well if your willing to spend the time to do it. Enjoy and as always, Happy Creative Crafting!!!!


Tuesday, March 13, 2012
Cardboard Creations
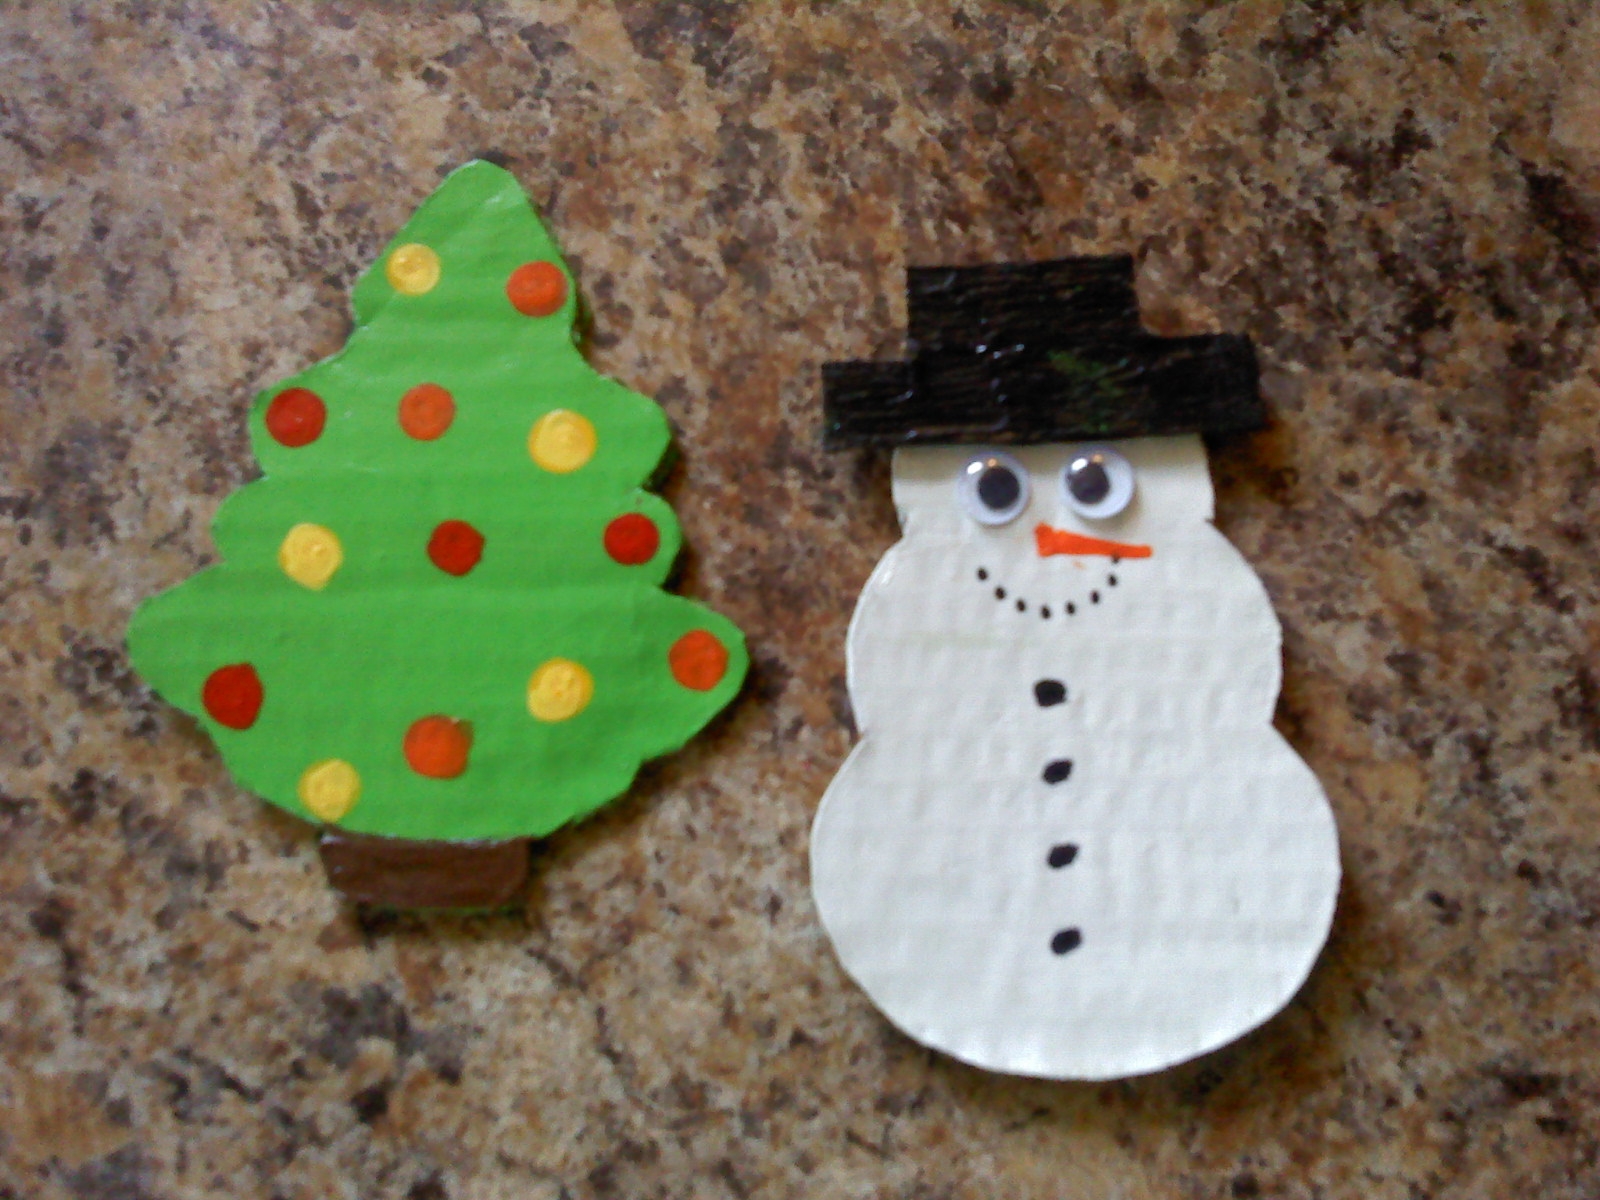
We all have some sort of cardboard around the house, whether it's from a shoe box, or pizza box, either way whatever kind of caardboard box you have, you can always put it to another use. if you have cookie cutter, or you ca get online patterns for making some cute ornaments, magnets or package toppers, whatever you choose to do, these cute cardboard creations will be fun,fast, and easy for even kids to do with mom or friends, or even host a party and make several, get your paints out and decorate away. these were made with cookie cuters, traced onto the cardboard, cut out and painted using acrylic paint(non toxic) add some wiggly eye's for the snowman, and use clear sealer to seal, and your creation is done.great for holidays.
 Next here is another cardboard craft I thought was fun, if your a crafty person like me, then this will be fun to make few or several, you can also write names,animals,decoupage a picture or something cute on it. this is a maneet, but would work great for bag toppers,ornaments as well. same way done as the top ones, make them big or small and have fun with it!
 Next here is another cardboard craft I thought was fun, if your a crafty person like me, then this will be fun to make few or several, you can also write names,animals,decoupage a picture or something cute on it. this is a maneet, but would work great for bag toppers,ornaments as well. same way done as the top ones, make them big or small and have fun with it!
Tuesday, March 6, 2012
Ceramic Coaster
Looking through all of our treasure we have in our storage trailer, I stumbled upon some tiles that I used for making some cute items for friends, gave as gifts, and trying to find things around the house so I don't have to go out and buy extra items that I don't need, I found stashed in my cabinets some cute napkins that I forgot I had. and putting the tile with the napkins and using decoupage, here is my cute coaster I made using my on hand items. Enjoy and as always Happy Crafting!


St.Patricks Day Shamrock

Brown bag bow
Using up those brown bags for anything and everything you could possibly imagine is just another way of being creative and crafty!, you always get some sort of brown bag wherever you go, whether it's from fast food,maybe an organic store or just buying it on a roll, either way using brown paper for crafting is a great way to craft, keeping pictures off any brown bag come in handy for crafting. like this cute little bow, can be used for putting in your hair, maybe on a gift bag or package or to use to decorate a journal. either way it's fast and cute and easy to make in seconds. this one is from a burger king brown bag and I cut the picture off the front and made this cute bow. Enjoy and Happy Crafting with brown bags.
 Items needed: brown bag pic from a brown bag,scissors(decorative) glue(aleenes tacky glue) fan fold your cut out picture from your bag, cut a strip big enough to wrap around the middle and glue to secure. and your done. Enjoy!!!!
 Items needed: brown bag pic from a brown bag,scissors(decorative) glue(aleenes tacky glue) fan fold your cut out picture from your bag, cut a strip big enough to wrap around the middle and glue to secure. and your done. Enjoy!!!!
Monday, March 5, 2012
Sachet Bags
I love the smell of lavendar and vanilla and cinnamon, I not only like my house to smell good, but love my car to smel good as well, nothing like getting into my car and smelling something nice. so I made this cute Tinkerbell sachet bag, along with other ones of different materials, added some potpourri and added some oil to enhance the smell, tied it off with a yellow ribbon and put it in my car, you can hang them or sit them on the dash board and when it's hot outside, the heat will heat up the potpourri inside the bag and your car will smell wonderful!!! I made these because any and all scents I have bought from stores and off other websites just didn't do anything for me. and to make my own and it work the way I want it to, was just great!!! these make great gifts, you can add them to your dresser draws and use the blow dryer on them to heat them and rerlease the scent if you like, and if the scent runs out within several uses you can add oil right back to it just taking the potpourri out and adding your oil and put it back in the bag, and your ready to freshen up any room you like. cheap to make and fun to smell! :) hope you enjoy.


Sunday, March 4, 2012
Bottle Cap Magnets

Subscribe to:
Posts (Atom)